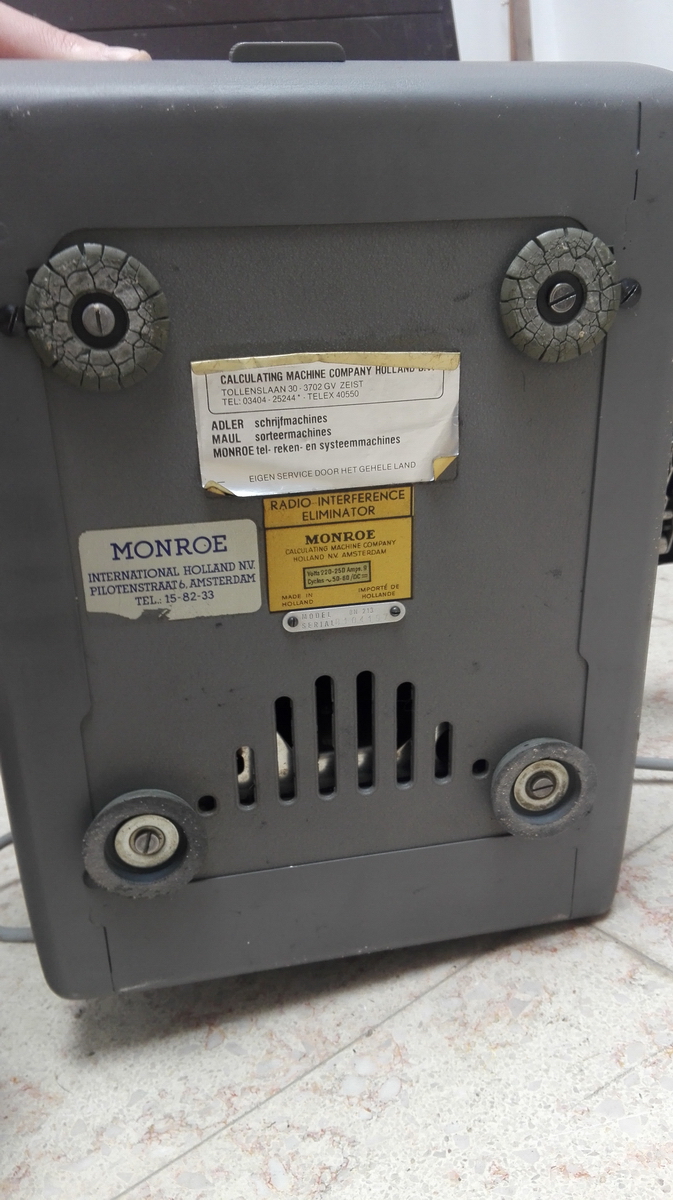
Monroe 8N-213
Serial B104197
This machine dates to the 1950s, and was made in Holland.
It is probably the most complicated machine I have in the collection, with also the largest number of possibilities and automated functions. That makes it a bit challenging to understand, but luckily there is a manual which contains example calculations. Monroe had one more complicated machine than this, the 88N, which in addition to the two counters had a twin result register.
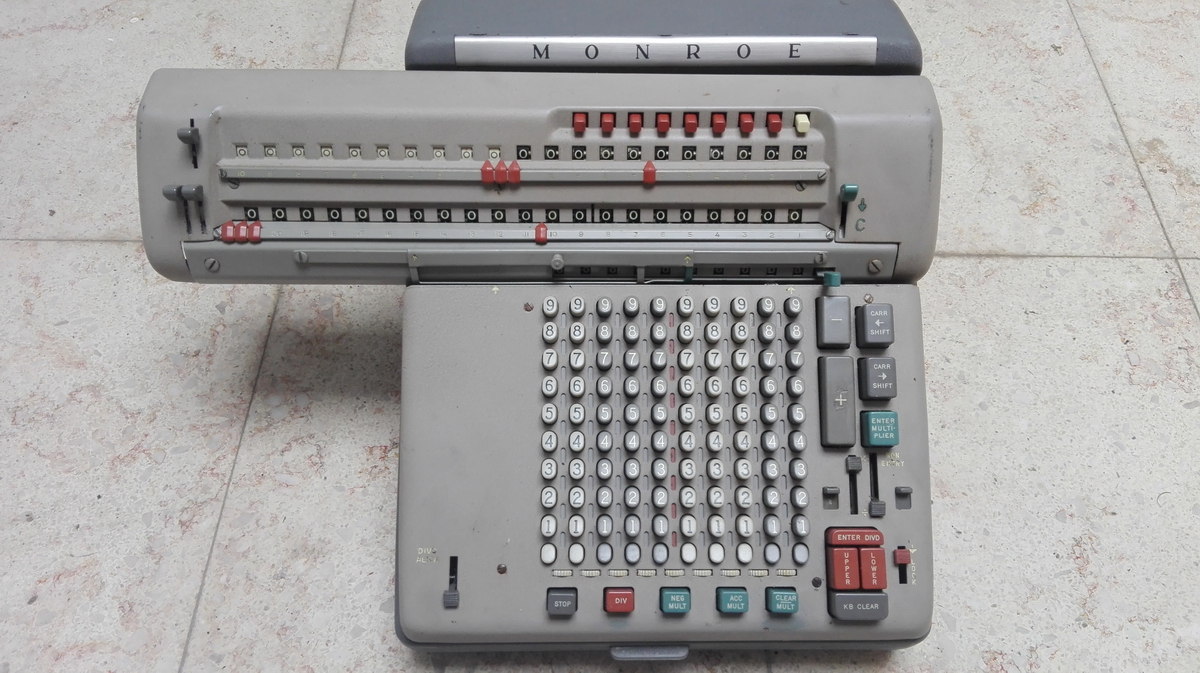
So - what do all the knobs and levers do ? Let's look at a picture first.
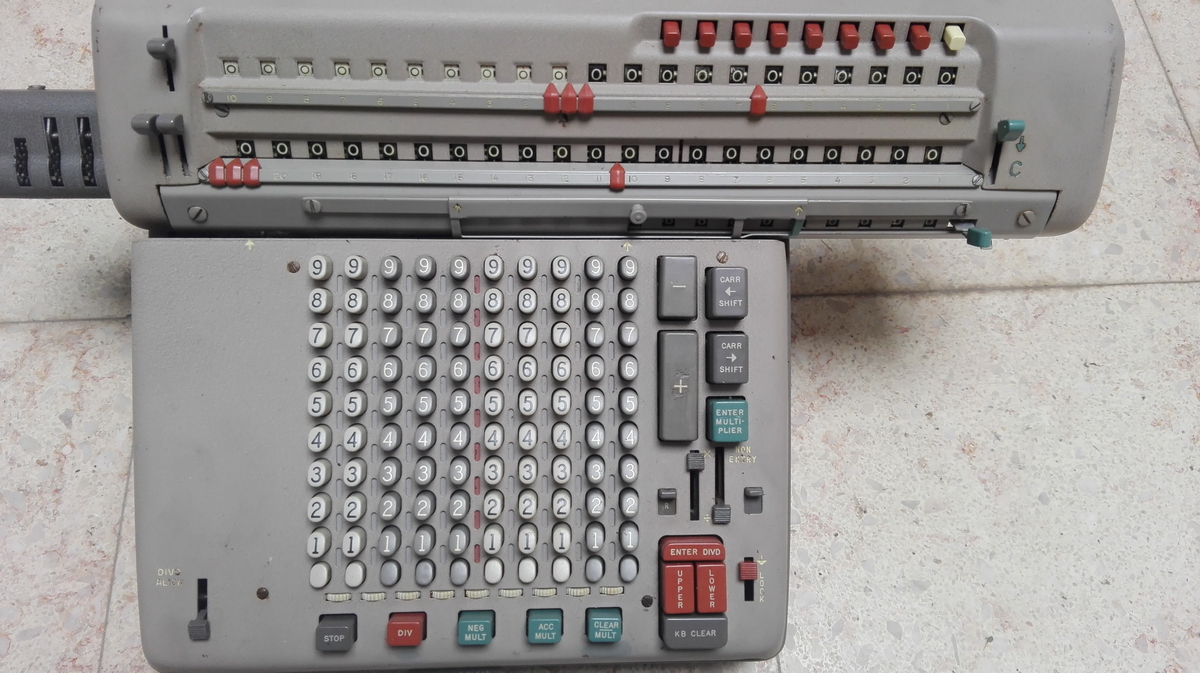
We can see there are 4 registers in the carriage, two counters at the top (the left one without tens' carriage), the result in the middle, and the setting/multiplier register at the bottom of the carriage.
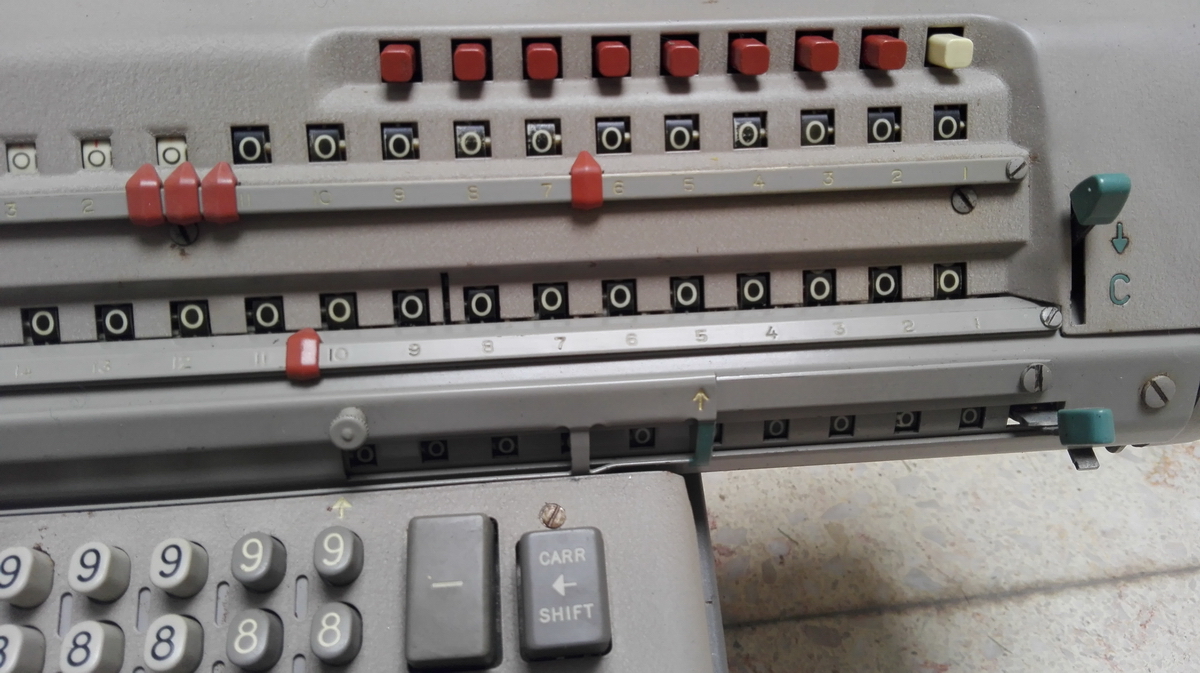
In addition, the multiplier register is a carriage-in-a-carriage, and can be shifted left to right by the green lever sticking out of it which is called the transfer lever. The grey "slide" part with the knob and the arrow limits its travel - the green lever at the right butts into the green steel part under the little arrow. The slide engages positively with the comma rule - there are drilled holes, and the knob pulls out, so once it clicks into position, it is stuck until you pull the lever. In the picture, the multiplier register is in its only possible position with respect to the machine body with the carriage all the way to the left - in order to move it further to the left, the carriage first needs to move to the right.
Now we can move on to the "regular" buttons that we recognize from any electric calculator: +, -, carriage shift left and right, and the clearing block at the bottom with buttons for keyboard clear, and the upper and lower register clear.
And then it gets interesting. Many of the other buttons lead to a combination of actions, that is sometimes only slightly different. The "enter multiplier" button does exactly that - it moves the carriage to the leftmost position, transfers the contents of the keyboard to the multiplier register, and clears the keyboard as well as the counter registers. During this process, a 1 is added and subtracted from the counters. It has another trick up its sleeve - if you hold the button as the transfer to the multiplier register happens, the keyboard is not cleared, which allows to immediately square a number by then pressing a multiplier button. Because apparently this caused confusion with the users, in my machine an extra little slider is added to the right of the non-entry slider. When slid down, this displays a square, and prevents the keyboard from being cleared the first time the "enter multiplier" button is pressed and the number is transferred. The kb will clear on the next push!
There are three multiplier buttons - "clear/mult" clears all result and counter registers, and multiplies the content of the keyboard with the multiplier register, emptying the multiplier register in the process. "Clear/mult" has another function, which is backtransfer from the result to the setting/multiplier register. With the carriage not in its leftmost position, the transfer lever can be pushed left and "clear/mult" will then do the backtransfer straight down, into whatever position the multiplier register is (handy for rounding). After multiplication, the keyboard is cleared, unless the "KB Clear"" slider at the front of the machine is not slid to the left, in which case it isn't. "Acc mult" on the other hand does not clear the registers in advance, which allows to accumulate sums of products. And finally, "neg mult" does not clear the registers and instead of adding the product to the result, subtracts it from it. It also counts negatively in the counters.
Also, this is where the little sliders under the "enter multiplier" come in. The left one, x/:, allows to change the direction of the counters if desired. Its setting is automatically operated with the automatic functions, but for non-automatic division it should be set to divide manually. The "lock" lever to the right of the clearing block locks this lever when automatic functions are executed (the manual specifies "for special calculations") - so use at your own risk.
Another interesting little lever is the "non entry" one. This essentially disconnects the right counter register during multiplication, which allows through a rather convoluted process to accumulatively multiply while also keeping track of the individual products. We will get back to that with an example in the video below.
To the left of the "x/:" and "NE" slide is the tiny "R/NR" lever. This controls the keyboard on addition or subtraction, and "R" stands for "retain" - the keyboard is cleared if it is on "NR" (down) and the number stays in the keyboard with "R".
Now we arrive at division. The "enter divd" key has five separate actions. 1. It clears all registers; 2. moves the carriage into position 10, or up to the tab that is set (we'll get back to tabs); 3.Enters the value in the keyboard into the result register; 4. Clears the 1 in the counter; 5. Clears the keyboard, ready for entering a divisor.
After a divisor has been entered in the correct position of the keyboard, press the "div" key, and division happens automatically. Also clears the keyboard when the "KB Clear " slide is to the left.
There is one more lever pertaining to division, namely the "div align" lever. If this is slid up, on starting the division, the carriage will shift to the right to line up the (smaller) divisor with the (larger) dividend. Obviously, this only works if on entering the dividen, a tab has been set, because otherwise it will be at the extreme left side of the carriage, and division won't work.
This brings us seamlessly to how to make sense of decimal positions and tabs.
On addition, check all the numbers and establish what the maximum number of decimals you may need is. Set this decimal position on the keyboard, and place it in an identical position on the result register.
For multiplication, set the number of decimals of the multiplicands and multipliers in the keyboard, and set the same decimal position in the counter register. Add the number of these decimal positions and set this as the decimal position in the result register.
For division, establish the number of decimals in dividends and divisors, set this in the keyboard. Establish how many decimals are needed in the quotient (take one extra for rounding), and set this in the counter. Set the sum of the decimal positions in the result register.
Very often, the decimal at the 5th position in kb and counter, and at 10 in the result is perfect for all common calculations.
Tabs are important when automatic multiplication and division are used to keep track of where the comma is. If you are doing a chain product where every factor has five decimals, you need a tab at position 6 and the setting slide for the multiplier register needs to be between 5 and 6, because for every multiplication the result needs to shift by 5 decimal positions. In division, the main function of the tab keys is to prevent the carriage to go all the way to the right when setting up the dividend. A tab needs to be set at the difference in the number of decades between the dividend and divisor. E.g 24563/45 - tab needs to be set at 7 (3 positions from the left, because the dividend has three more digits than the divisor) for the divisor to be able to line up. The final set of levers we haven't discussed yet is on the carriage. There is the green C lever, which keeps (well, re-places) the multiplier in the multiplier register for repeated multiplications. There are also three blocking levers that when in the downwards position prevent the clearing of the counters (top lever) and result (bottom two levers) when they would normally be cleared by an automatic operation. The result register has two levers, because the clearing (or rather blocking) can be split 10/10.
A very final feature is the automatic rounding in position 8 of the result. (decimals at 4 and 4, 8 in the result). If the tiny lever next to result wheel n° 8 is pushed down, and a 5 is added to that column with the keyboard, this 5 is blocked in the result register, and automatically rounds the digit in position 9 up. Now we'll do an example calculation where the full bag of tricks this machine has is put to work - we want the sum of two products, but we also want to know the individual products. This is Monroe's recommendation for doing that: decimal position in the keyboard at 4, counter at 4, result at 4+4 =8. Disengage div align (down). Tab at 7, non-entry engaged (up), slide at 6/7. Blocking lever for the counter engaged (down). Set 14.25 in the keyboard, press enter mult. The 14.25 is transferred to the multiplication register and cleared. Set 19.37 in the keyboard, press "clear mult". Multiplication happens, the result (276.0225) is now in the result register. The multiplier is in the left counter, and the right counter is at 0 because of the "NE" slider. Now we set 1 into the keyboard and press "DIV", while we are writing down the 276.0225 in the result. This number is divided by 1, the tab has been manually set at 7 so that is where the carriage stops for lining up the 1 with the "dividend". The latter hence appears as the quotient in the top right counter register. Subsequent multiplications are made in the same way, and the partial product can be written down from the result register as it is added to the number in the right counter register.
And finally, some pictures!